Creating Policies
Policies enable you to organize computers running the Carbon Black App Control Agent into groups with common security requirements.
For example, you can create policies based on departmental affiliations like sales, marketing, or other organizational relationships. You might also create policies specific to a computer’s purpose, such as a special domain controller policy. A single policy may be appropriate if you want a single, company-wide operating standard for all computers, but typically you create multiple policies.
Usually, you assign policies to computers, not users, but you can use Active Directory data to assign policy by user. Each computer has only one policy at a time, regardless of the number of users currently logged on.
Once you create a policy, you can assign computers to it through a variety of methods, including automatic assignment based on Active Directory group. For more information on policy assignment, see Managing Computers.
When you create a policy, Carbon Black App Control attempts to create an agent installer that assigns the policy to computers that use the installer. If you have not yet uploaded agent installer packages and a rules file to your server, or if agent installer creation is disabled for all operating systems, creating a policy generates error events indicating that the agent installers for that policy cannot be created. You can still create the policy, but to avoid populating the Events log with errors each time you create a policy, the best practice is to upload agent and rule installers before creating policies. For information on uploading agent installers and rules to the server, see Carbon Black App Control Agent Installation Guide.
Policy names can use alphanumeric characters and certain symbols in the ISO-8559-1 set. Characters in the 32-126 range in the ISO-8559-1 set are legal, with the following exceptions: < > : " / \ | ? * # @ `
If you enter Unicode characters or reserved symbols in a policy name, the console displays a warning dialog. You must remove the illegal characters from the name before you can save the policy.
Some characters that are allowable in policy names might cause problems when running the agent installer for the policy. For policies that can be applied to Mac computers, avoid parentheses and spaces in the name, or be prepared to “escape” these characters when you run the installer.
Create a Policy
Use this procedure to create a new policy.
-
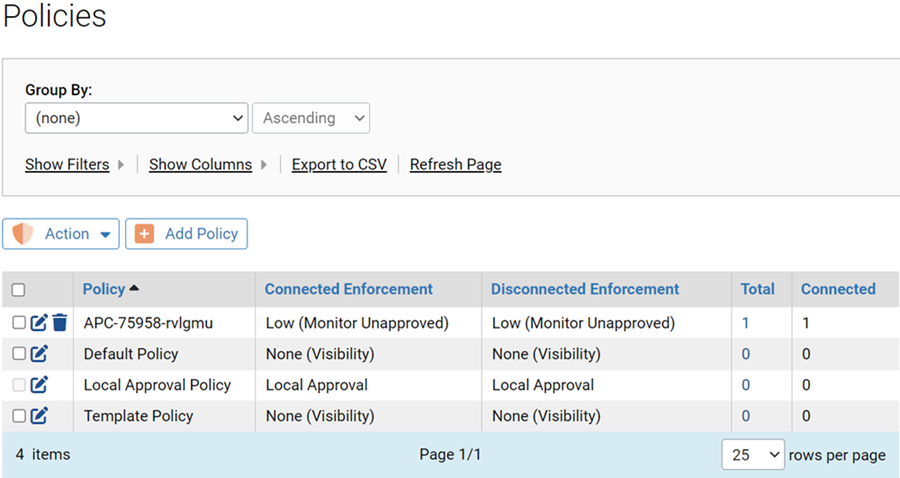
On the console menu, choose
Rules > Policies. The Policies page appears:
-
On the Policies page, click the Add Policy button. The
Add Policy page appears (shown below for a Control policy):
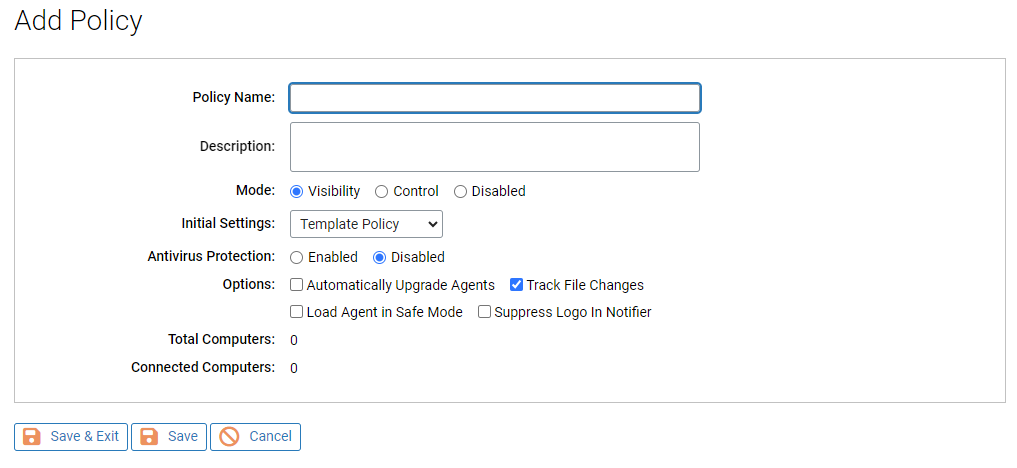
- On the Add Policy page, enter a policy name and define the other policy parameters as you choose (see Policy Definitions) – the parameters you see may vary depending upon other policy settings and configuration choice.
-
After you have provided the
policy configuration parameters on this page, click the
Save button.
The new policy appears in the table on the Policies page.
-
To modify the Device Settings or
Advanced Settings for this policy, click the View Details
button next to the new policy name, make your modifications, and click
Save.
To see the Device and Advanced Settings on the Add Policy page, you must save the policy first.
Note:- For more information about the Device Settings and other device monitoring and control features in Carbon Black App Control, see Managing Devices
- For information about customizing the notifier displayed on a client computer when policy and ban settings are enforced, see Endpoint Notifiers and Approval Requests